Up Your OAuth2.0 Game: Using Inbound Client Credentials From Washington DC
Table of Contents
This article and the following articles in the Up your OAuth2.0 series, will guide you through setting up different types of OAuth Clients and Providers, including extended concepts around OIDC and more! After the guide, I’ll also talk through brief cases of where you might use each variant.
The first article focusses on Inbound API Authentication to your ServiceNow instance, using the Client Credentials grant which was implemented in the Washington DC release. This article drills into how to leverage the Client Credentials grant to generate a token, for use with APIs on your Instance.
Guide:
This guide requires the user to have created an Application Registry for client credentials, as discussed in this article. You will require your Client ID, Client Secret, and optionally your scopes.
Anatomy of a client credentials grant:
In order to request an access token from an OAuth2.0-compliant token endpoint, you must use particular authorization request formats. These are referred to as authorization grants, and differ depending on which authorization grant type you are using. The grant in this case is the Client Credentials grant, but you can read up on some other grant types on this site. These details are provided in the Body of a HTTP POST request to the /oauth_token.do endpoint on your instance. These requests are of the Content-Type application/x-www-form-urlencoded.
A client credentials grant contains the following attributes:
grant_type(required): This indicates to the server what grant you are using. In client credential grants, the value is alwaysclient_credentialsscope(optional): This indicates to the server what scopes, if any, this credential should be assuming. This will only apply to scopes that are available to the Application Registry, and theuseraccountscope.- Note: As of Washington DC Patch 4 Hotfix 1, regardless of the scope values provided, the token will receive all scopes available to the Application Registry
In addition to those attributes, you also need to provide your Client ID and Client Secret for Authentication. There are two ways to do this:
- Provide two additional parameters:
client_id: Your Client ID valueclient_secret: Your Client Secret Value
- Provide the details as a Basic Auth header (preferred)
- Header:
Authorization - Value:
Basic, followed byclient_id:client_secretencoded to base64
- Header:
You can read more about this format here and in the standard under Client Credential Grant and Client Password.
Crafting a Token Request
Putting all of our attributes and details from above together, we can now request a token. Using a ServiceNow instance, Postman, Soap UI, or any other tool that can perform REST API calls, perform the following steps:
- Set your HTTP Method to be
POST - Set your Endpoint/URL to be
https://{instance_url}/oauth_token.do - Add a
Content-Typeheader, and set its value to beapplication/x-www-form-urlencoded - Add an
Acceptheader, and set its value to beapplication/json - Add an
Authorizationheader, and set its value to beBasicfollowed by your Client ID and Client Secret in the formatclient_id:client_secret, encoded in base64- Note: Solutions like Postman and ServiceNow allow you to provide your Basic Auth credentials in appropriate interfaces and perform the base64 encoding for you. You can also do this by hand.
- Note: Do not provide the OAuth Application User’s credentials here. You only need Client ID and Client Secret in this grant type
- Set the request body in the following format:
grant_type=client_credentials&scope={desired scope or scopes, split by spaces}- Example:
grant_type=client_credentials&scope=useraccount - Note: The above format is required if providing this in a raw text field. If using a solution like Postman where these can be provided as key-value pairs, do not include = or & as these are handled for you. Scope is not restricting the scopes selected as mentioned earlier
- Example:
- Send your request!
Below is an image reflecting how this message looks in Postman, and a RESTMessageV2 snippet version, as well as an example of a successful response payload.
Postman
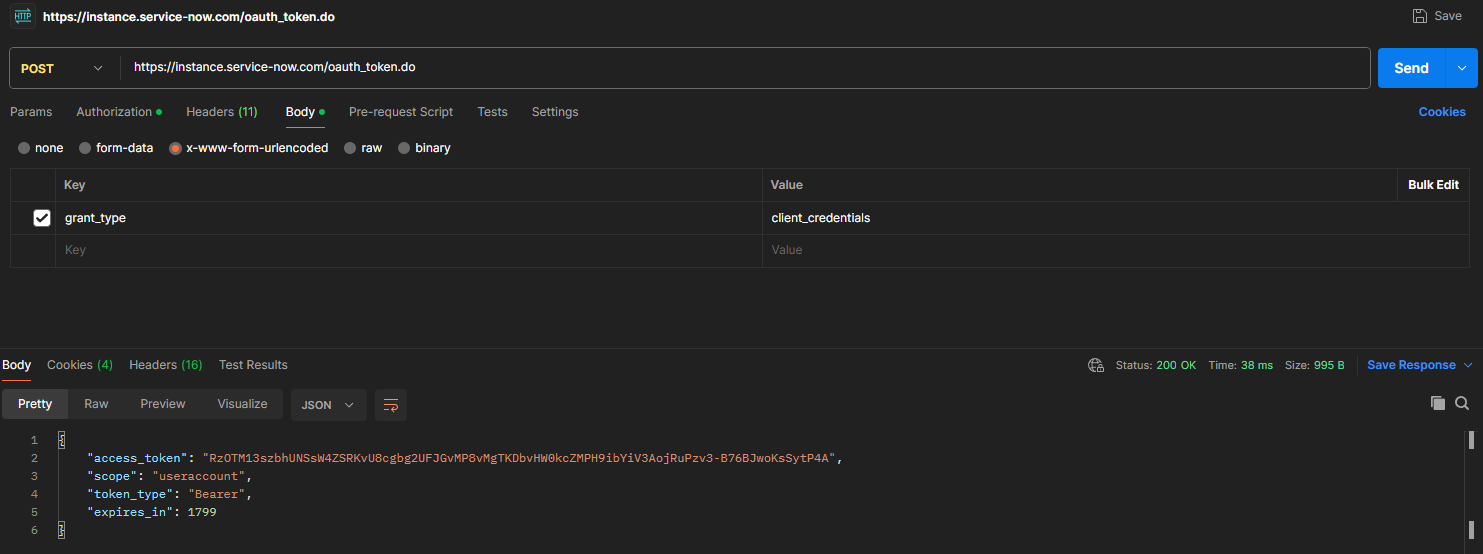
An example of a Postman request body, response body, and endpoint configuration
ServiceNow Script Example
var request = new sn_ws.RESTMessageV2();
request.setEndpoint('https://{instance_url}/oauth_token.do');
request.setHttpMethod('POST');

var clId = 'value';
var clSecret = 'value';

request.setBasicAuth(clId,clSecret);
request.setRequestHeader('Accept','application/json');
request.setRequestHeader('Content-Type','application/x-www-form-urlencoded');
request.setRequestHeader('Accept','application/json');
request.setRequestBody('grant_type=client_credentials')

var response = request.execute();
gs.info(response.getBody());
Successful Response
The resulting payload will appear as below on a successful call, with scope and expires_in varying depending on your Application Registry configuration:
{
    "access_token": "ACCESS_TOKEN_VALUE",
    "scope": "",
    "token_type": "Bearer",
    "expires_in": 1799
}
Now that you have a successful response, you can use this token in an Authorization header with value Bearer followed by your token, and proceed to leverage this token to integrate with your ServiceNow instance.
Closing notes
This article has been a quick demonstration of how to leverage a Client Credential grant with ServiceNow. Please let me know if you run into any challenges or are keen to see additional information, as I’m happy to expand on this and I would like to incorporate a troubleshooting section. I’d like to thank Martin Ivanov for reaching out with a question about this functionality, who prompted me to develop this page to simplify the adoption of this grant.
Thank you for reading, and I hope you enjoyed/found value in this article. As always, I am open to feedback and can be reached via Slack, LinkedIn, or email.